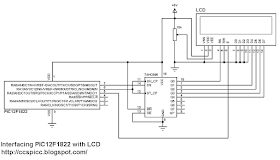
PIC12F1822 LCD Example using CCS PIC C compiler with one line scrolling
This topic shows how to interface the microcontroller PIC12F1822 with LCD display (1602, 2004 .....) using CCS C compiler.The microcontroller PIC12F1822 has only 8 pins and only 5 of them can be configured as outputs. The LCD display needs at least 6 data lines to operate and we can not connect it directly to PIC12F1822 microcontroller.
Using a serial in parallel out shift register (74HC595, 74HC164, CD4094 ......) we can minimize the number of pins used by the LCD to 3.
Using the 3-wire LCD driver of the CCS C compiler we can easily interface the PIC12F1822 with LCD display. The 3-wire LCD driver can be found at:
3-Wire LCD driver for CCS PIC C compiler
It is easy to add this driver to your project just download the C file and copy it to your project folder or to the CCS PIC C driver folder.
Components list:
- PIC12F1822 Microcontroller
- LCD Display with HD44780 or compatible controller
- 74HC595 Shift Register (74HC164 or CD4094 can be used)
- 10K Variable Resistor
- +5V Power Supply
- Breadboard
- Jumper Wires
The shift register data line is connected to RA0 pin and the clock line is connected to RA1 pin. LCDs enable pin is connected to pin RA3.
The internal oscillator of the PIC12F1822 microcontroller is used.
To see how to use 74HC164 or CD4094 instead of 74HC595 see the 3-wire LCD driver topic at the link above.
Interfacing PIC12F1822 microcontroller with LCD display CCS C code:
This is the full code of this example where the microcontroller runs with its internal oscillator at 32MHz. The code shows how to make only one line scrolling as shown in the video below.
// Interfacing PIC12F1822 with LCD display CCS PIC C code
// 3-Wire LCD driver must be added
// http://ccspicc.blogspot.com/
// electronnote@gmail.com
// Use at your own risk

//LCD module connections
#define LCD_DATA_PIN PIN_A0
#define LCD_CLOCK_PIN PIN_A1
#define LCD_EN_PIN PIN_A2
//End LCD module connections

#include <12F1822.h>
#fuses NOMCLR INTRC_IO PLL_SW
#use delay(clock=32000000)
#include <3WireLCD.c>

unsigned int8 i;
char message[] = "PIC12F1822 LCD Example ";
void main() {
  setup_oscillator(OSC_8MHZ | OSC_PLL_ON);    // Set internal oscillator to 32MHz
  lcd_initialize();                           // Initialize LCD module
  lcd_cmd(LCD_CLEAR);                         // Clear the LCD
  lcd_goto(3, 1);                             // Go to column 3 line 1
  lcd_out("Hello world!");
  // Scroll 2nd line only
  for(i = 17; i > 0; i--){
    lcd_goto(i, 2);
    printf(lcd_out, message);
    delay_ms(200);
  }
  for(i = 0; i < 23; i++){
    lcd_goto(1, 2);
    printf(lcd_out, message + i);
    delay_ms(200);
  }
  // End scrolling 2nd line
  delay_ms(2000);
  lcd_goto(4, 2);                             // Go to column 4 line 2
  lcd_out("3-Wire LCD");
  delay_ms(2000);
  lcd_goto(4, 2);                             // Go to column 4 line 2
  lcd_out("          ");                      // Clear 2nd line
  i = 0;
  while(TRUE){
    for(i = 0; i < 200; i++){
      lcd_goto(7, 2);                           // Go to column 7 row 4
      printf(lcd_out,"%3u",i);                  // Write i with 3 numbers max
      delay_ms(500);
    }
  }
}                                                // End of program
PIC12F1822 LCD Example Video:
