Thursday, July 27, 2017

CDROM Sensored brushless DC motor drive with PIC16F887 microcontroller


BLDC Motor control using PIC16F887
In this blog there are some topics shows how to drive a cd-rom (dvd-rom) spindle motor using different types of PIC microcontrollers. This topic shows how to control the speed of a sensored BLDC motor using PIC16F887 microcontroller.
The BLDC motor is a three phase DC motor without brushes.
Basically there are two types of BLDC motors: sensored and sensorless. The sensored BLDC motor has 3 hall effect sensors which detect the rotor position while the sensorless BLDC motor has no hall effect sensors and it uses back emf to detect the rotor position.
The sensored BLDC motor is easy to drive because always we know the position of its rotor with the help of the hall effect sensors.
As mentioned above, the BLDC motor is a 3 phase DC motor which means it has 3 winding on the stator core. Two windings are excited at a time to create a rotating electric field. This method is fairly easy to implement, but to prevent the permanent magnet rotor from getting locked with the stator, the excitation on the stator must be sequenced in a specific manner while knowing the exact position of the rotor magnets.
3 phase BLDC motor coils
The sensored BLDC motor has 3 hall effect sensors (Sensor A, Sensor B and Sensor C) to sense rotor position, this sensors are placed as shown in the following picture. The motor which I'm going to drive has pinout as shown below (other motors may have another pinout).
In this motor each hall effect sensor has 4 pins: VCC, GND and two outputs (some sensors come with 3 pins: VCC, GND and output).
cd rom or dvd rom bldc motor pin configuration
Each sensor outputs a digital high for 180 electrical degrees and outputs a digital low for the other 180 electrical degrees. The following figure shows the relationship between the sensors outputs and the required motor drive voltages for phases A, B and C.
sensored bldc motor driving sequence
A three phase bridge is used to energize the BLDC motor windings.
3 phase inverter bridge for 3 phase bldc motor
According to the hall effect sensors, the 3 phase inverter bridge is controlled as shown in the following table:
bldc motor sequence table 
Hardware Required:
  • PIC16F887 microcontroller  -- datasheet
  • 20MHz crystal oscillator 
  • 2 x 22pF capacitor
  • Sensored BLDC motor
  • 10k ohm potentiometer
  • 2 x SN74LS08N  -- datasheet
  • SN74LS04N        -- datasheet
  • LM339 quad comparators -- datasheet
  • 3 x IRF4905 P-channel mosfet   -- datasheet
  • 3 x IRF3205 N-channel mosfet  -- datasheet
  • 3 x 2N2222A NPN transistor  -- datasheet
  • 6 x 22K ohm resistor
  • 6 x 10K ohm resistor
  • 4 x 100 ohm resistor
  • Protoboards
  • 12V voltage source
  • 5V voltage source
  • Jumper wires
CD-ROM Sensored brushless DC motor drive with PIC16F887 microcontroller circuit:
BLDC motor controller circuit (esc) using PIC16F887 microcontroller
In the circuit there are 3 comparators A, B and C (LM339) which are used with the hall effect sensors to detect rotor position. The complete circuit of the LM339 is shown below:
bldc motor hall effect sensors with LM339
Also in the circuit there are 8 AND and 3 NOT gates, and for that I used 2 x SN74LS08 (each one contains 4 AND gates) and one SN74LS04. The complete circuit of the three ICs is shown below:
SN74LS08 and SN74LS04 circuit
The two gates AND1 and AND2 are used to create two PWM signals from single PWM signal because PIC16F887 microcontroller has only two PWM modules and our project needs 3.
The other AND gates (AND3 - 8) and the NOT gates are used to drive the bridge mosfets and also provides a good protection to our mosfets because high and low mosfets of one line must not be ON at the same time.
A 10K ohm potentiometer is used to control the speed of the BLDC motor where its output is connected to AN0.
A 20MHZ crystal oscillator is used and MCLR pin function is disabled.
CD-ROM Sensored brushless DC motor drive with PIC16F887 microcontroller C code:
The following is code is for CCS PIC C compiler.
The potentiometer is used to vary the duty cycle of PWM1 and PWM2 signals which causes the speed of the BLDC motor to change. The outputs are controlled according to the following table:
bldc motor driving table
The two PWM modules of the PIC16F887 are used to generate two PWM signals. Timer2 module is configured so that the each PWM signal has a frequency of 4.88KHz and 10-bit resolution:
setup_timer_2(T2_DIV_BY_4, 255, 1);
The potentiometer is used to change the duty cycle of the PWM signal which causes the speed of the BLDC motor to change.
The complete C code of this project is as the one below:
/* CD-ROM sensored BLDC motor drive with PIC16F887 microcontroller CCS PIC C code
   PIC16F887 runs with 20MHz crystal oscillator
   http://ccspicc.blogspot.com/
   electronnote@gmail.com
*/

#include <16F887.h>
#device ADC = 10
#fuses NOMCLR, NOBROWNOUT, NOLVP, HS
#use delay(clock = 20MHz)
#use fast_io(B)
#use fast_io(D)

int8 hall, prev_hall;
int16 speed;
void bldc_move(){
  switch(hall){
    case 1:
      setup_ccp2(CCP_PWM);
      output_d(0x12);
      break;
    case 2:
      setup_ccp2(CCP_OFF);
      output_d(0x0B);
      break;
    case 3:
      setup_ccp2(CCP_PWM);
      output_d(0x18);
      break;
    case 4:
      setup_ccp2(CCP_PWM);
      output_d(0x0C);
      break;
    case 5:
      setup_ccp2(CCP_OFF);
      output_d(0x0E);
      break;
    case 6:
      setup_ccp2(CCP_PWM);
      output_d(3);
      break;
    default:
      setup_ccp2(CCP_OFF);
      output_d(0);
      break;
  }
}
void main(){
  output_b(0);
  set_tris_b(7);                                 // Configure RB0, RB1 and RB2 as digital input pins
  port_b_pullups(7);                             // Enable internal weak pull-ups for RB0, RB1 and RB2
  output_d(0);
  set_tris_d(0);                                 // Configure PORTD pins as outputs
  setup_ccp1(CCP_PWM);                           // Configure CCP1 module as PWM
  setup_ccp2(CCP_OFF);                           // CCP2 module OFF
  setup_adc(ADC_CLOCK_INTERNAL);                 // ADC module uses its internal oscillator
  setup_adc_ports(sAN0);                         // Configure AN0 as analog input pin
  set_adc_channel(0);                            // Select channel AN0
  setup_timer_2(T2_DIV_BY_4, 255, 1);            // Set PWM frequency to 4.88KHz with a resolution of 10 bits
  delay_ms(1000);                                // Wait 1 second
  read_adc(ADC_START_ONLY);                      // ADC start only
  while(TRUE){
    if(!adc_done()){                             // If the conversion is completed
      speed = read_adc(ADC_READ_ONLY);           // ADC read only
      set_pwm1_duty(speed);                      // Set PWM1 duty cycle
      set_pwm2_duty(speed);                      // Set PWM2 duty cycle
      read_adc(ADC_START_ONLY);                  // ADC start only
    }
    hall = input_b() & 7;                        // Read hall effect sensors from pins: RB0, RB1 and RB2
    if(hall != prev_hall){                       // If the rotor position changed
    bldc_move();                                 // Move the rotor according to hall effect senors state
    prev_hall = hall;                            // Save current rotor position
    }
  }
}
Finally the following video shows a simple hardware circuit of the project.

Tuesday, July 18, 2017

Two DC motors control with NEC IR remote control


After controlling 2 DC motors speed and direction of rotation with 2 potentiometers, now let's make the same project but with IR remote control. First project is at the link below:
Two motors control using PIC16F887 and L293D
The microcontroller used in this project is PIC16F887 and the remote control is Car MP3 IR remote control which uses NEC protocol. Decoding of this remote control with PIC16F887 is done in the following project:
NEC Protocol decoder with PIC16F887 microcontroller
In this project 6 buttons are used for controlling the speed and rotation direction of the 2 motors, these buttons are shown in the following image:
Car MP3 NEC remote control button codes
The code of each button are as shown in the following table (these codes will be used later in the C code):

Button Number
Function
Code
1
Motor 1 Start/Toggle direction
0x40BF00FF
2
Motor 1 speed down
0x40BF807F
3
Motor 1 speed up
0x40BF40BF
4
Motor 2 Start/Toggle direction
0x40BF20DF
5
Motor 2 speed down
0x40BFA05F
6
Motor 2 speed up
0x40BF609F

Hardware Required:
  • PIC16F887 microcontroller
  • 2 x DC motor (I used 12V motors)
  • L293D motor driver
  • NEC IR remote control (I'm using Car MP3 as the one above)
  • IR receiver
  • 10K ohm resistor
  • 47µF capacitor
  • 5V and 12V voltage sources
  • Breadboard
  • Jumper wires
Two DC motors control with NEC IR remote control and PIC16F887 circuit:
Remote controlled 2 DC motors using PIC16F887 and L293D circuit
As shown in the circuit diagram the IR receiver output is connected to RB0 pin which is external interrupt pin of the PIC16F887 microcontroller.
The L293D IC is used to drive both motors in the two directions, the speed of the two motors is controlled the two PWM signals which come from the microcontroller. PWM1 controls motor 1 speed and PWM2 controls motor 2 speed. Motor 1 direction is controlled with IN1 and IN2 pins of the L293D, these pins are connected to RD0 and RD1 of the PIC16F887. Motor 2 is controlled with pin IN3 and IN4 of the L293D, IN3 is connected to RD2 and IN4 is connected to RD3 of the microcontroller. When IN1 = IN2 = 0, motor 1 stops, when IN1 = 1 and IN2 = 0 motor 1 moves in the first direction, when IN1 = 0 and IN2 = 1 motor 1 moves in the second direction. The same thing for motor 2 with pins IN3 and IN4.
The 10K ohm resistor is used to minimize the IR receiver output noise.
In the circuit there are two voltage sources, one with 5V which supplies most of the circuit and the other one with 12V which supplies only the L293D IC. The 12V source depends on the motors nominal voltage.
In this project the PIC16F887 uses its internal oscillator and MCLR pin function is disabled.

Two DC motors control with NEC IR remote control CCS C code:
Project C code is as shown below. It has been tested with CCS PIC C compiler version 5.051.
PIC16F887 hardware external interrupt and Timer1 are used to decode the IR remote control. Timer1 is used to measure pulses and spaces widths and its interrupt (Timer1 interrupt) is used to reset the decoding process in case of very long pulse or space (time out). Timer1 is configured to increment every 1µs using the following command line:
setup_timer_1( T1_INTERNAL | T1_DIV_BY_2 );
But Timer1 module will not start until the microcontroller receives an interrupt on pin RB0 (interrupt edge from high to low).
The motor speed changes whenever the duty cycle of the PWM signal changes, and thus if the microcontroller receives speed up button code it will increment the duty cycle, then motor speed will be increased, and if the microcontroller receives speed down button code, the duty cycle will be decreased which causes the motor to decrease its speed.
At start up , both motors are stopped because all PORTD pins are zeroes with the command output_d(0); and when start/toggle direction button is pressed, the motor will start (if there is sufficient duty cycle otherwise the duty cycle have to be increased), and the same button pressed again the motor will change its direction of rotation.
The full C code is shown below.
// 2 Motors control with NEC IR remote control CCS C code
// Used MCU: PIC16F887
// Internal oscillator used @ 8MHz
// Used remote control: Car MP3 IR remote control
// PWM1 and PWM2 modules are used to control motor 1 and motor 2 speeds respectively
// http://ccspicc.blogspot.com/
// electronnote@gmail.com

#include <16F887.h>
#fuses NOMCLR NOBROWNOUT NOLVP INTRC_IO
#use delay(clock = 8MHz)

short nec_ok = 0, repeated = 0, m1_dir = 0, m2_dir = 0;
unsigned int8 nec_state = 0, i, duty1 = 0, duty2 = 0;
unsigned int32 nec_code;
#INT_EXT                                         // External interrupt
void ext_isr(void){
  unsigned int16 time;
  if(nec_state != 0){
    time = get_timer1();                         // Store Timer1 value
    set_timer1(0);                               // Reset Timer1
  }
  switch(nec_state){
    case 0 :                                     // Start receiving IR data (we're at the beginning of 9ms pulse)
      setup_timer_1( T1_INTERNAL | T1_DIV_BY_2 );   // Enable Timer1 module with internal clock source and prescaler = 2
      set_timer1(0);                             // Reset Timer1 value
      nec_state = 1;                             // Next state: end of 9ms pulse (start of 4.5ms space)
      i = 0;
      ext_int_edge( L_TO_H );                    // Toggle external interrupt edge
      break;
    case 1 :                                     // End of 9ms pulse
      if((time > 9500) || (time < 8500)){        // Invalid interval ==> stop decoding and reset
        nec_state = 0;                           // Reset decoding process
        setup_timer_1(T1_DISABLED);              // Stop Timer1 module
      }
      else
        nec_state = 2;                           // Next state: end of 4.5ms space (start of 562µs pulse)
      ext_int_edge( H_TO_L );                    // Toggle external interrupt edge
      break;
    case 2 :                                     // End of 4.5ms space
      if((time > 5000) || (time < 1500)){        // Invalid interval ==> stop decoding and reset
        nec_state = 0;                           // Reset decoding process
        setup_timer_1(T1_DISABLED);              // Stop Timer1 module
        break;
      }
      nec_state = 3;                             // Next state: end of 562µs pulse (start of 562µs or 1687µs space)
      if(time < 3000)                            // Check if previous code is repeated
        repeated = 1;
      ext_int_edge( L_TO_H );                    // Toggle external interrupt edge
      break;
    case 3 :                                     // End of 562µs pulse
      if((time > 700) || (time < 400)){          // Invalid interval ==> stop decoding and reset
        nec_state = 0;                           // Reset decoding process
        setup_timer_1(T1_DISABLED);              // Disable Timer1 module
      }
      else{
        // Check if the repeated code is for buttons 2, 3, 5 or 6
        if(repeated && (nec_code == 0x40BF807F || nec_code == 0x40BF40BF ||
                        nec_code == 0x40BFA05F || nec_code == 0x40BF609F)){
          repeated = 0;
          nec_ok = 1;                            // Decoding process is finished with success
          disable_interrupts(INT_EXT);           // Disable the external interrupt
          break;
        }
        nec_state = 4;                           // Next state: end of 562µs or 1687µs space
        ext_int_edge( H_TO_L );                  // Toggle external interrupt edge
        break;
      }
    case 4 :                                     // End of 562µs or 1687µs space
      if((time > 1800) || (time < 400)){         // Invalid interval ==> stop decoding and reset
        nec_state = 0;                           // Reset decoding process
        setup_timer_1(T1_DISABLED);              // Disable Timer1 module
        break;
      }
      if( time > 1000)                           // If space width > 1ms (short space)
        bit_set(nec_code, (31 - i));             // Write 1 to bit (31 - i)
      else                                       // If space width < 1ms (long space)
        bit_clear(nec_code, (31 - i));           // Write 0 to bit (31 - i)
      i++;
      if(i > 31){                                // If all bits are received
        nec_ok = 1;                              // Decoding process is finished with success
        disable_interrupts(INT_EXT);             // Disable the external interrupt
      }
      nec_state = 3;                             // Next state: end of 562µs pulse (start of 562µs or 1687µs space)
      ext_int_edge( L_TO_H );                    // Toggle external interrupt edge
  }
}
#INT_TIMER1                                      // Timer1 interrupt (used for time out)
void timer1_isr(void){
  nec_state = 0;                                 // Reset decoding process
  ext_int_edge( H_TO_L );                        // External interrupt edge from high to low
  setup_timer_1(T1_DISABLED);                    // Disable Timer1 module
  clear_interrupt(INT_TIMER1);                   // Clear Timer1 interrupt flag bit
}
void main(){
  setup_oscillator(OSC_8MHZ);                    // Set internal oscillator to 8MHz
  output_d(0);
  enable_interrupts(GLOBAL);                     // Enable global interrupts
  enable_interrupts(INT_EXT_H2L);                // Enable external interrupt
  clear_interrupt(INT_TIMER1);                   // Clear Timer1 interrupt flag bit
  enable_interrupts(INT_TIMER1);                 // Enable Timer1 interrupt
  setup_timer_2(T2_DIV_BY_16, 255, 1);           // Set PWM frequency to 488Hz
  setup_ccp1(CCP_PWM);                           // Configure CCP1 module as PWM
  setup_ccp2(CCP_PWM);                           // Configure CCP2 module as PWM
  set_pwm1_duty(0);                              // Set PWM1 duty sycle
  set_pwm2_duty(0);                              // Set PWM2 duty sycle
  while(TRUE){
    if(nec_ok){                                  // If the MCU receives a message from the remote control
      nec_ok = 0;                                // Reset decoding process
      nec_state = 0;
      setup_timer_1(T1_DISABLED);                // Disable Timer1 module
      // Motor 1
      if(nec_code == 0x40BF00FF && m1_dir){      // If button 1 is pressed (toggle rotation direction of motor 1)
        m1_dir = 0;
        nec_code = 0;
        output_high(PIN_D0);
        output_low(PIN_D1);
      }
      if(nec_code == 0x40BF00FF && !m1_dir){      // If button 1 is pressed (toggle rotation direction of motor 1)
        m1_dir = 1;
        output_low(PIN_D0);
        output_high(PIN_D1);
      }
      if(nec_code == 0x40BF40BF && duty1 < 255){ // If button 3 is pressed (increase motor 1 speed)
        duty1++;
        set_pwm1_duty(duty1);
      }
      if(nec_code == 0x40BF807F && duty1 > 0){   // If button 2 is pressed (decrease motor 1 speed)
        duty1--;
        set_pwm1_duty(duty1);
      }
      // Motor 2
      if(nec_code == 0x40BF20DF && m2_dir){      // If button 4 is pressed (toggle rotation direction of motor 2)
        m2_dir = 0;
        nec_code = 0;
        output_high(PIN_D2);
        output_low(PIN_D3);
      }
      if(nec_code == 0x40BF20DF && !m2_dir){     // If button 4 is pressed (toggle rotation direction of motor 2)
        m2_dir = 1;
        output_low(PIN_D2);
        output_high(PIN_D3);
      }
      if(nec_code == 0x40BF609F && duty2 < 255){ // If button 6 is pressed (increase motor é speed)
        duty2++;
        set_pwm2_duty(duty2);
      }
      if(nec_code == 0x40BFA05F && duty2 > 0){   // If button 5 is pressed (decrease motor 2 speed)
        duty2--;
        set_pwm2_duty(duty2);
      }
      enable_interrupts(INT_EXT_H2L);            // Enable external interrupt
    }
  }
}
The following video shows a hardware circuit of our project:


Sunday, July 16, 2017

Two motors control using PIC16F887 and L293D


The L293D quadruple half-H drivers chip allows us to drive 2 motors in both directions, and with the two PWM modules on the PIC16F887 microcontroller we can easily control the rotation speed of the two motors. (PWM: Pulse Width Modulation).
This small example shows how to implement a control circuit which controls speed and direction of rotation using PIC16F887 microcontroller and L293D IC.
The microcontroller PIC16F887 has one ECCP (Enhanced Capture/Compare/PWM) module and one CCP module. The two modules can be configured as PWM modules to generate two independent PWM signals (always with the same frequency). The speed of each motor can be controlled with the variation of the duty cycle of the PWM signal. The output pins of PWM1 and PWM2 are RC2 and RC1 respectively.
Required Components:
  • PIC16F887 microcontroller
  • 2 x DC motor (I used motors of 12V)
  • L293D motor driver
  • 2 x 10K ohm potentiometer
  • 5V Power source
  • 12V Power source (In case of 12V DC motors)
  • Breadboard
  • Jumper wires
Two motors control using PIC16F887 and L293D circuit:
Example circuit diagram is shown below.
Two DC motors control using PIC16F887 and L293D circuit diagram
In the circuit there are two potentiometers POT1 and POT2 which are used to control the speed as well as the direction of rotation of motor 1 and motor 2 respectively. POT1 is connected to analog channel 0 (AN0) and POT2 is connected to analog channel 1 (AN1).
PWM1 pin (RC2) is connected to EN1,2 pin (#1) and PWM2 pin (RC1) is connected to EN2,3 pin (#9) of the L293D. The other L293D pins which are IN1, IN2, IN3 and IN4 are connected to RD0, RD1, RD2 and RD3 respectively.
Motor 1 rotation speed is controlled by PWM1 and its direction of rotation is controlled by pins IN1 and IN2. If IN1 and IN2 are zeroes the motor stops, if IN1 = 1 and IN2 = 0 the motor rotates in the one direction, if IN1 = 0 and IN2 = 1 the motor rotates in the other direction.
The same thing for motor 2 with pins PWM2, IN3 and IN4.
In the circuit there are two power supply sources, 5V and 12V. The 5V supplies most of the circuit including the microcontroller whereas the 12V supplies one pin of the L293D (VCC2). The 12V power supply source depends on the motor nominal voltage, for example if the motor voltage is 5V, VCC2 pin should be connected to +5V source.
In this example PIC16F887 uses its internal oscillator and MCLR pin function is disabled.
Two motors control using PIC16F887 and L293D CCS C code:
In this example we've two potentiometers POT1 and POT2 connected to AN0 and AN1. Each potentiometer controls speed and rotation direction of one motor. In the code there are three intervals after reading and saving the analog value. The first interval is [ 0, 500 [ which controls the motor speed in the first direction where the maximum speed is when the analog value = 0. The second interval is [ 500, 523 ], here the motor stops. The last interval is ] 523, 1023] where the motor speed is controlled in the other direction and the maximum speed when the analog value = 1023. 10-Bit ADC resolution is used.
Timer2 module is configured to generate PWM signals of 1KHz whith a resolution of 8.96 bits :
setup_timer_2(T2_DIV_BY_16, 124, 1);
Where: T2_DIV_BY_16 is Timer2 prescaler
              124 is Timer2 preload value
              1 is Timer2 postoscaler (not used in calculations)
The PWM frequency can be calculated using the following equation:
PWM Period = [(PR2) + 1] * 4 * TOSC * (TMR2 Prescale Value)
Where the PWM frequency = 1/ PWM period
PR2: Timer2 preload value
TOSC = 1/MCU frequency (in this example MCU frequency = 8MHz)
The resolution of the PWM signal can be calculated using the following equation:
               log[4(PR2 + 1)]
Resolution = ---------------------   bits
                  log(2)
// Control of 2 motors using PIC16F887 microcontroller CCS C code
// Internal oscillator used @ 8MHz
// http://ccspicc.blogspot.com/
// electronnote@gmail.com

#include <16F887.h>
#device ADC = 10
#fuses NOMCLR, NOBROWNOUT, NOLVP, INTRC_IO
#use delay(clock = 8MHz)

signed int16 i, j;
void main(){
  setup_oscillator(OSC_8MHZ);                    // Set internal oscillator to 8MHz
  setup_adc(ADC_CLOCK_INTERNAL);                 // ADC module uses its internal oscillator
  setup_adc_ports(sAN0 | sAN1);                  // Configure AN0 & AN1 as analog input pins
  setup_timer_2(T2_DIV_BY_16, 124, 1);           // Set PWM frequency to 1KHz with a resolution of 8.96-bit
  setup_ccp1(CCP_PWM);                           // Configure CCP1 module as PWM
  setup_ccp2(CCP_PWM);                           // Configure CCP2 module as PWM
  set_pwm1_duty(0);                              // Set PWM1 duty cycle
  set_pwm2_duty(0);                              // Set PWM2 duty cycle
  while(TRUE){
    set_adc_channel(0);                          // Select channel AN0
    delay_ms(100);
    i = read_adc();                              // Read analog value from channel '0' and store it in 'i'
    set_pwm1_duty(abs(i - 511));                 // Set PWM1 duty cycle (abs => absolute value
    set_adc_channel(1);                          // Select channel AN1
    delay_ms(100);
    j = read_adc();                              // Read analog value from channel '1' and store it in 'j'
    set_pwm2_duty(abs(j - 511));                 // Set PWM2 duty cycle (abs => absolute value
    if(i > 523){
      output_high(PIN_D0);
      output_low(PIN_D1);
    }
    else{
      if(i < 500){
        output_low(PIN_D0);
        output_high(PIN_D1);
      }
      else{
        output_low(PIN_D0);
        output_low(PIN_D1);
      }
    }
    if(j > 523){
      output_high(PIN_D2);
      output_low(PIN_D3);
    }
    else{ 
      if(j < 500){
        output_low(PIN_D2);
        output_high(PIN_D3);
      }
      else{
        output_low(PIN_D2);
        output_low(PIN_D3);
      }
    }
  }
}
Video:

Friday, October 21, 2016

DC Motor control using PIC12F1822 and L293D


With the help of L239D we can easily control DC motor speed and direction of rotation.
The L293D can control two motors with the same nominal voltage independently and in this project we are going to use half of the chip to control just one motor.
The microcontroller used in this project is PIC12F1822, it's an 8-bit and 8 pins microcontroller. This microcontroller has 1 CCP module which can be used to generate a PWM signal.
The following topic shows how to use PIC12F1822 ADC and PWM modules:
PIC12F1822 ADC and PWM modules
DC Motor control using PIC12F1822 and L293D circuit:
DC Motor control circuit using PIC12F1822 and L293D
Motor speed is controlled from a 10k potentiometer connected to RA0 pin. Two push buttons connected to RA1 and RA3 are used to select direction of rotation and another push button connected to RA4 is used to stop the motor.
The DC motor voltage is 12V which is the same as L293D VS voltage (pin 8).
The PWM signal output pin is selected by the software (RA2 or RA5).
PIC12F1822 internal oscillator is used and internal pull-ups is enabled for the inputs.
Here the microcontroller reads the analog data comes from the potentiometer and uses the corresponding digital value to set the PWM duty cycle.
DC Motor control using PIC12F1822 and L293D CCS C code:
In this project PIC12F1822 internal oscillator is used @ 8MHz with PLL enabled (gives 32MHz) and internal pull-ups are enebled for the inputs RA1, RA3 and RA4.
Timer2 is configured to generate a PWM signal of 1.95KHz with a resolution of 10-bit.
setup_timer_2(T2_DIV_BY_16, 255, 1);
CCP Module is configured to work as PWM module and the output pin of the PWM signal can be selected using the following two lines:
setup_ccp1(CCP_PWM | CCP1_A2);
setup_ccp1(CCP_PWM | CCP1_A5);
The complete CCS C code is below.
// DC Motor control using PIC12F1822 and L293D CCS PIC C code
// http://ccspicc.blogspot.com/
// electronnote@gmail.com
// Use at your own risk

#include <12F1822.h>
#fuses NOMCLR INTRC_IO PLL_SW
#device ADC = 10
#use delay(clock=32000000)
#use fast_io(A)

int8 s;                                               // Used to know motor status
int16 i;
void main() {
  setup_oscillator(OSC_8MHZ | OSC_PLL_ON);            // Set internal oscillator to 32MHz (8MHz and PLL)
  output_a(0);
  set_tris_a(0x1B);                                   // Configure RA0, RA1, RA3 & RA4 as inputs 
  port_a_pullups(0x1A);                               // Enable internal pull-ups for pins RA1, RA3 & RA4
  setup_adc(ADC_CLOCK_DIV_32);                        // Set ADC conversion time to 32Tosc
  setup_adc_ports(sAN0);                              // Configure AN0 pin as analog
  set_adc_channel(0);                                 // Select analog channel AN0
  setup_ccp1(CCP_OFF);                                // CCP1 OFF
  setup_timer_2(T2_DIV_BY_16, 255, 1);                // Set PWM frequency to 1.95KHz with 10-bit resolution
  while(TRUE){
    if(s != 0){
      i = read_adc();                                 // Read from AN0 and store in i
      set_pwm1_duty(i);                               // Set pwm1 duty cycle
      delay_ms(10);                                   // Wait 10 ms
    }
    if(!input(PIN_A1) && (s != 1)){                   // If RA1 button pressed
      s = 1;
      setup_ccp1(CCP_OFF);                            // CCP1 OFF
      output_a(0);
      delay_ms(50);
      setup_ccp1(CCP_PWM | CCP1_A2);                  // Configure CCP1 as a PWM (output at RA2)
    }
    if(!input(PIN_A3) && (s != 2)){                   // If RA3 button pressed
      s = 2;
      setup_ccp1(CCP_OFF);                            // CCP1 OFF
      output_a(0);
      delay_ms(50);
      setup_ccp1(CCP_PWM | CCP1_A5);                  // Configure CCP1 as a PWM (output at RA5)
    }
    if(!input(PIN_A4) && (s != 0)){                   // If RA4 button pressed
      s = 0;
      setup_ccp1(CCP_OFF);                            // CCP1 OFF
      output_a(0);
    }
  }
}

Thursday, October 20, 2016

PIC12F1822 ADC and PWM modules


This topic gives a short descriptions about PIC12F1822 microcontroller ADC and PWM module and how to use them using CCS PIC C compiler. For more details go to PIC12F1822 datasheet.
PIC12F1822 ADC Module:
PIC12F1822 microcontroller has a 10-bit ADC (Analog-to Digital Converter) module. 4 Pins can be used as analog inputs which are: RA0 (AN0), RA1 (AN1) RA2 (AN2) a,d RA4 (AN3).
The ADC module is used to read analog data comes from analog devices like analog potentiometer and analog temperature sensors ......
The ADC converts analog data into 10-bit digital data which is stored into the ADC result registers (ADRESH:ADRESL register pair).
The following CCS C line is used to configure PIC12F1822 ADC module:
setup_adc(int16 mode);
Where mode is the source of the conversion clock (ADC clock source). There
are seven possible clock options:
• FOSC/2
• FOSC/4
• FOSC/8
• FOSC/16
• FOSC/32
• FOSC/64
• FRC (dedicated internal oscillator)
CCS PIC C compiler uses the following constants for the previous parameters (used with setup_adc():
ADC_CLOCK_DIV_2
ADC_CLOCK_DIV_4
ADC_CLOCK_DIV_8
ADC_CLOCK_DIV_32
ADC_CLOCK_DIV_16
ADC_CLOCK_DIV_64
ADC_CLOCK_INTERNAL
And to turn off the ADC use the following constant:
ADC_OFF
Example:
setup_adc(ADC_CLOCK_DIV_4);
The following line is used to configure a digital pin as analog:
setup_adc_ports();
The following constants are used in the previous function:
sAN0                             // Configure AN0 as analog
sAN1                             // Configure AN0 as analog
sAN2                             // Configure AN0 as analog
sAN3                             // Configure AN0 as analog
NO_ANALOGS             // All pins are configured as digital
ALL_ANALOGS             // All pins are configured as analog
Example:
setup_adc_ports(sAN1);                                   // Configure AN1 as analog
setup_adc_ports(sAN0 | sAN3);                      // Configure AN0 and AN3 as analog
To read analog data the analog channel must be selected first using this line:
set_adc_channel(int8 channel);
Where channel can be: 0, 1, 2 or 3.
Example:
set_adc_channel(2);               // Select analog channel 2
And to read data use the following line:
read_adc();
PIC12F1822 PWM module:
PIC12F1822 microcontroller has 1 ECCP module (Enhanced Capture/Compare/PWM) which allows us to generate Pulse-Width Modulation (PWM) signals.
The PWM period is specified by the PR2 register of Timer2. The PWM period can be calculated using the following equation:
PWM period = [(PR2) + 1] • 4 • Tosc • (TMR2 Prescale Value)
And the PWM frequency is defined as 1/[PWM period].
PR2 is Timer2 preload value,
Tosc = 1/(MCU_frequency)
TMR2 Prescale Value can be 1, 4, 16 or 64.
For example forPR2 = 255 , microcontroller frequency = 8MHz and Prescale = 16 we get a PWM frequency of 488Hz.
The CCS Timer2 configuration has the following form:
setup_timer_2(mode,  period, postscale);
where: mode is TMR2 Prescale Value, period is PR2 and postscaler is not used in the determination of the PWM frequency (keep it 1).
Previous example gives the following Timer2 configuration command:
setup_timer_2(T2_DIV_BY_16, 255, 1);
The PWM resolution determines the number of available duty cycles for a given period. For example, a 10-bit resolution will result in 1024 discrete duty cycles, whereas an 8-bit resolution will result in 256 discrete duty cycles.
The maximum PWM resolution is 10 bits when PR2 is 255. The resolution is a function of the PR2 register value as shown by the following equation:
Resolution = log[4 * (PR + 1)]/log(2)
The following line is used to set the PWM signal duty cycle:
set_pwm1_duty(i);
Where i is an int16 number.
We can change the output pin of the PWM signal and we can select between RA2 pin or RA5 pin respectively using the following two line where the first one is default:
setup_ccp1(CCP_PWM | CCP1_A2);       ( Same as setup_ccp1(CCP_PWM );  )
setup_ccp1(CCP_PWM | CCP1_A5);
PIC12F1822 ADC + PWM example:
This example shows how to use the digital value of the analog reading to set the duty cycle of the PWM signal. This example uses analog channel AN0 and the ECCP module to control the brightness of an LED connected to RA2 as shown in the following circuit schematic:
PIC12F1822 microcontroller ADC and PWM example circuit
PIC12F1822 Internal oscillator is used and MCLR pin function is disabled in this project.
PIC12F1822 ADC + PWM example CCS C code:
PIC12F1822 internal oscillator is used @ 8MHz and PLL is enabled which gives a microcontroller frequency of 32MHz.
Timer2 is configured to generate 1.95KHz PWM signal with a resolution of 10-bit.
// PIC12F1822 ADC & PWM example CCS PIC C code
// http://ccspicc.blogspot.com/
// electronnote@gmail.com
// Use at your own risk

#include <12F1822.h>
#fuses NOMCLR INTRC_IO PLL_SW
#device ADC = 10
#use delay(clock=32000000)

int16 i;
void main() {
  setup_oscillator(OSC_8MHZ | OSC_PLL_ON);            // Set internal oscillator to 32MHz (8MHz and PLL)
  setup_adc(ADC_CLOCK_DIV_32);                        // Set ADC conversion time to 32Tosc
  setup_adc_ports(sAN0);                              // Configure AN0 pin as analog
  set_adc_channel(0);                                 // Select channel AN0
  setup_ccp1(CCP_PWM);                                // Configure CCP1 as a PWM
  setup_timer_2(T2_DIV_BY_16, 250, 1);                // Set PWM frequency to 1.95KHz with 10-bit resolution
  while(TRUE){
    i = read_adc();                                   // Read from AN0 and store in i
    set_pwm1_duty(i);                                 // Set pwm1 duty cycle
    delay_ms(10);                                     // Wait 10 ms
  }
}

Reference:
PIC12F1822 Datasheet

Tuesday, September 20, 2016

IR Remote control transmitter and receiver using PIC12F1822 microcontroller


5-Channel IR remote control system using PIC microcontroller
This topic shows how to make a simple infrared (IR) remote control system using the microcontroller PIC12F1822. This IR system has two circuits as known: IR transmitter circuit and IR receiver circuit. Both circuit based on the same microcontroller type which is PIC12F1822.
This IR system uses NEC communication protocol. To see how the NEC protocol works read the following topic which shows how to decode this communication protocol using PIC12F1822 microcontroller.
Extended NEC Protocol Decoder Using PIC12F1822 Microcontroller

Components List:
Transmitter Circuit:
  • PIC12F1822 Microcontroller
  • IR Transmitter
  • 2N2222 Transistor
  • 5 Push Buttons
  • 10k Resistor
  • 100Ohm Resistor
  • +5V Power Source
  • Protoboard
  • Jumper Wires
Receiver Circuit:
  • PIC12F1822 Microcontroller
  • IR Receiver
  • 5 LEDs
  • 10k Resistor
  • 5 x 470 Ohm Resistors
  • 47uF Capacitor
  • +5V Power Source
  • Protoboard
  • Jumper Wires
NEC Protocol IR transmitter (Encoder) using PIC12F1822:
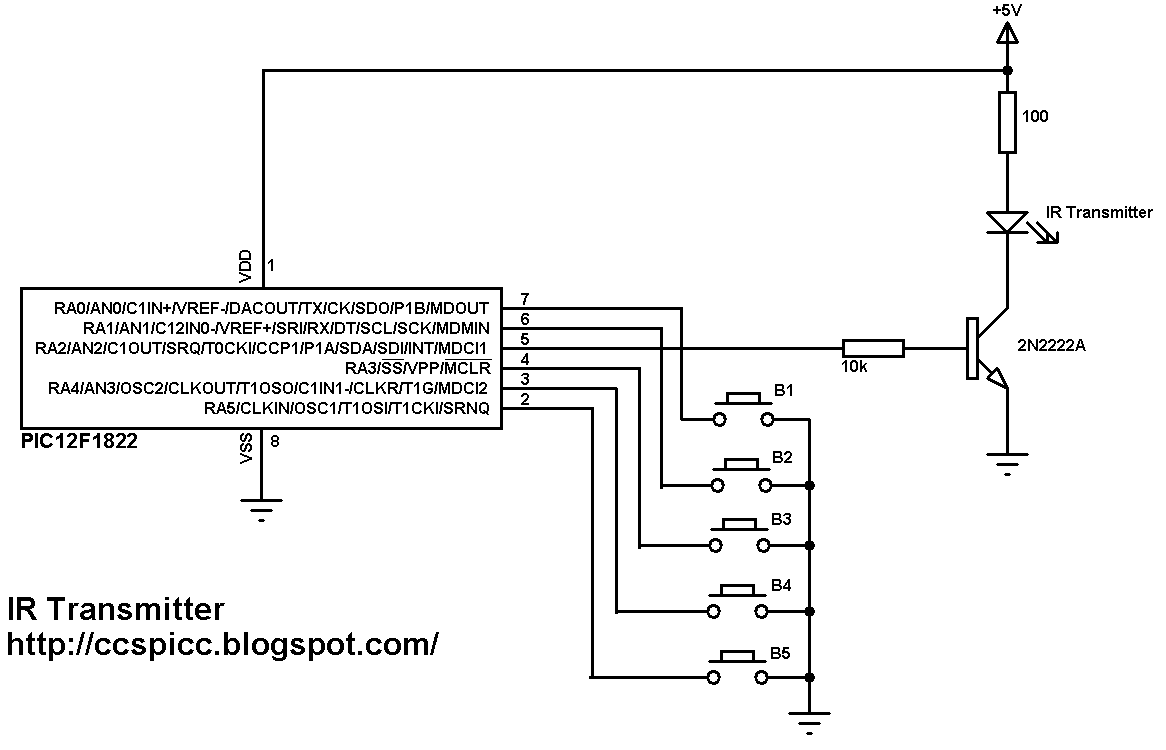
The following image shows the IR system transmitter circuit schematic diagram.
NEC IR remote control transmitter circuit PIC12F1822
In the circuit there 5 push buttons and each button sends a different IR signal code. The IR transmitter is the element that sends the IR signals to the IR receiver circuit.
The NPN transistor 2N2222 is used to drive the IR transmitter because the IR transmitter consumes high current and the microcontroller generally can't provide that amount of current.
PIC12F1822 internal pull-ups are enabled by the software and the internal oscillator is used as usual.
NEC Protocol IR transmitter (Encoder) using PIC12F1822 CCS PIC C code:
This is the full code of microcontroller of the NEC IR transmitter.
The NEC protocol carrier frequency is 38KHz and to generate this frequency PIC12F1822 CCP module is used as a PWM module. The floowing CCS C line is used to configure the PWM module:
#use pwm (PWM1, FREQUENCY = 38KHz, DUTY = 25, PWM_OFF)
The internal oscillator is used and set to 8MHz with PLL enabled (8 x 4 = 32MHz). The following line is used for that:
setup_oscillator(OSC_8MHZ | OSC_PLL_ON);
In the circuit there are 5 push buttons connected to RA0, RA1, RA3, RA4 and RA5 which means that pins must be configured as inputs and the PWM pin as output.
Internal pull-ups are enabled for the input pins with the following line:
port_a_pullups(0x3B);
The five buttons transmit the following signals respectively:
0x40BF00FF -- 0x40BF807F -- 0x40BF40BF -- 0x40BF20DF -- 0x40BFA05F
1s and 0s are transmitted as:
Transmit 1 : pwm_on();
Transmit 0: pwm_off();
For example the transmission of 9ms burst pulse and 4.5ms space:
// Send 9ms burst
pwm_on();
  delay_ms(9);
  // Send 4.5ms space
  pwm_off();
  delay_us(4500);

Full Code:
// Extended NEC protocol IR remote control transmitter CCS PIC C code
// http://ccspicc.blogspot.com/
// electronnote@gmail.com
// Use at your own risk

#include <12F1822.h>
#fuses NOMCLR INTRC_IO PLL_SW
#use delay(clock=32000000)
#use fast_io(A)
#use pwm (PWM1, FREQUENCY = 38KHz, DUTY = 25, PWM_OFF)

void send_signal(unsigned int32 number){
  int8 i;
  // Send 9ms burst
  pwm_on();
  delay_ms(9);
  // Send 4.5ms space
  pwm_off();
  delay_us(4500);
  // Send data
  for(i = 0; i < 32; i++){
    // If bit is 1 send 560us pulse and 1680us space
    if(bit_test(number, 31 - i)){
      pwm_on();
      delay_us(560);
      pwm_off();
      delay_us(1680);
    }
    // If bit is 0 send 560us pulse and 560us space
    else{
      pwm_on();
      delay_us(560);
      pwm_off();
      delay_us(560);
    }
  }
  // Send end bit
  pwm_on();
  delay_us(560);
  pwm_off();
  delay_us(560);
}
void main() {
  setup_oscillator(OSC_8MHZ | OSC_PLL_ON);            // Set internal oscillator to 32MHz (8MHz and PLL)
  output_a(0);
  set_tris_a(0x3B);                                   // Configure RA2 pin as output and others as inputs
  port_a_pullups(0x3B);                               // Enable internal pull-ups for pins RA0,RA1,RA3,RA4 & RA5
  while(TRUE){
    while(!input(PIN_A0)){
      send_signal(0x40BF00FF);
      delay_ms(500);
    }
    while(!input(PIN_A1)){
      send_signal(0x40BF807F);
      delay_ms(500);
    }
    while(!input(PIN_A3)){
      send_signal(0x40BF40BF);
      delay_ms(500);
    }
    while(!input(PIN_A4)){
      send_signal(0x40BF20DF);
      delay_ms(500);
    }
    while(!input(PIN_A5)){
      send_signal(0x40BFA05F);
      delay_ms(500);
    }
  }
}
NEC Protocol IR receiver (Decoder) using PIC12F1822:
The NEC receiver circuit schematic is shown below.
NEC IR remote control receiver circuit PIC12F1822
In the IR receiver circuit there are 5 LEDs and IR receiver. The IR receiver receives IR signals transmitted from the IR transmitter. Each LED is remotely controlled from one button in the transmitter circuit.
PIC12F1822 internal oscillator is used and MCLR pin is configured as a digital input pin.
NEC Protocol IR receiver (Decoder) using PIC12F1822 CCS PIC C code:
As in the IR transmitter the internal oscillator of the IR receiver microcontroller is used.
Timer1 is configured to increment every 1us and it is used to measure pulses spaces duration.
SETUP_TIMER_1(T1_INTERNAL | T1_DIV_BY_8);
For example to check the 9ms pulse the following lines are used:
// Check 9ms pulse (remote control sends logic high)
  SET_TIMER1(0);
  while(!input(IR_Sensor) && (count < 9500))
    count = GET_TIMER1();
  if( (count > 9499) || (count < 8500))
    return FALSE;

And checking the 4.5ms space as follows:
// Check 4.5ms space (remote control sends logic low)
  SET_TIMER1(0);
  count = 0;
  while((input(IR_Sensor)) && (count < 5000))
    count = GET_TIMER1();
  if( (count > 4999) || (count < 4000))
    return FALSE;

Full Code:
// Extended NEC protocol IR remote control decoder using PIC12F1822 CCS PIC C code
// http://ccspicc.blogspot.com/
// electronnote@gmail.com
// Use at your own risk

#include <12F1822.h>
#fuses NOMCLR INTRC_IO PLL_SW
#use delay(clock=32000000)
#use fast_io(A)
#define IR_Sensor PIN_A3

unsigned int32 ir_code;
short nec_remote_read(){
  unsigned int16 count = 0;
  unsigned int8 i;
  // Check 9ms pulse (remote control sends logic high)
  SET_TIMER1(0);
  while(!input(IR_Sensor) && (count < 9500))
    count = GET_TIMER1();
  if( (count > 9499) || (count < 8500))
    return FALSE;
  // Check 4.5ms space (remote control sends logic low)
  SET_TIMER1(0);
  count = 0;
  while((input(IR_Sensor)) && (count < 5000))
    count = GET_TIMER1();
  if( (count > 4999) || (count < 4000))
    return FALSE;
  // Read message (32 bits)
  for(i = 0; i < 32; i++){
    SET_TIMER1(0);
    count = 0;
    while(!input(IR_Sensor) && (count < 650))
      count = GET_TIMER1();
    if( (count > 649) || (count < 500))
      return FALSE;
    count = 0;
    SET_TIMER1(0);
    while((input(IR_Sensor)) && (count < 1800))
      count = GET_TIMER1();
    if( (count > 1799) || (count < 400))
      return FALSE;
    if( count > 1000)                                 // If space width > 1ms
      bit_set(ir_code, (31 - i));                     // Write 1 to bit (31 - i)
    else                                              // If space width < 1ms
      bit_clear(ir_code, (31 - i));                   // Write 0 to bit (31 - i)
  }
  return TRUE;
}
void main() {
  setup_oscillator(OSC_8MHZ | OSC_PLL_ON);            // Set internal oscillator to 32MHz (8MHz and PLL)
  output_a(0);
  set_tris_a(8);
  SETUP_TIMER_1(T1_INTERNAL | T1_DIV_BY_8);
  while(TRUE){
    while(input(IR_Sensor));                          // Wait until IR_Sensor pin falls
    if(nec_remote_read()){
      if(ir_code == 0x40BF00FF)
        output_toggle(PIN_A0);
      if(ir_code == 0x40BF807F)
        output_toggle(PIN_A1);
      if(ir_code == 0x40BF40BF)
        output_toggle(PIN_A2);
      if(ir_code == 0x40BF20DF)
        output_toggle(PIN_A4);
      if(ir_code == 0x40BFA05F)
        output_toggle(PIN_A5);
      }
  }
}
IR Remote control transmitter and receiver using PIC12F1822 microcontroller video:
The following video shows project final result.